cIOS
cIOS, or custom IOS, are patched and modified versions of certain IOS (or simply, parts of the Wii's system software) that allow homebrew apps like USB loaders to be able to function where they otherwise would not. While not required for a functioning homebrew setup, it is highly recommended to install cIOS anyway because it augments the functionality of your Wii with little to no downside.
DANGER
Wii에 vWii/Wii 미니 IOS 또는 시스템 메뉴를 설치하려고 시도하지 마세요. 그렇게 하면 콘솔이 벽돌될 가능성이 높습니다.
WARNING
Ensure that if you are using an SD card, the lock switch is in the unlocked position. Otherwise, you will not be able to select the correct options in the installer.
요구 사항
- 홈브류 채널이 설치된 Wii
- SD 카드 및 USB 드라이브
- d2x cIOS 설치 프로그램
지침
섹션 I - 다운로드
WARNING
Your browser or antivirus software may flag NUSGet as malware - this is a false positive. NUSGet does NOT contain any malware.
TIP
If you are able to connect your Wii to the internet, you may skip to Section II.
Power off your console, and insert your SD card or USB drive into your computer.
On your computer, download NUSGet, choosing the archive corresponding to your operating system. For Windows users, you should choose the
NUSGet-Windows-x86_64-bin.zipfile.Unzip the archive and run the NUSGet executable.
Navigate to
IOS->IOS 38->Worldand double click onv4123. UncheckKeep encrypted contents, then clickStart Download.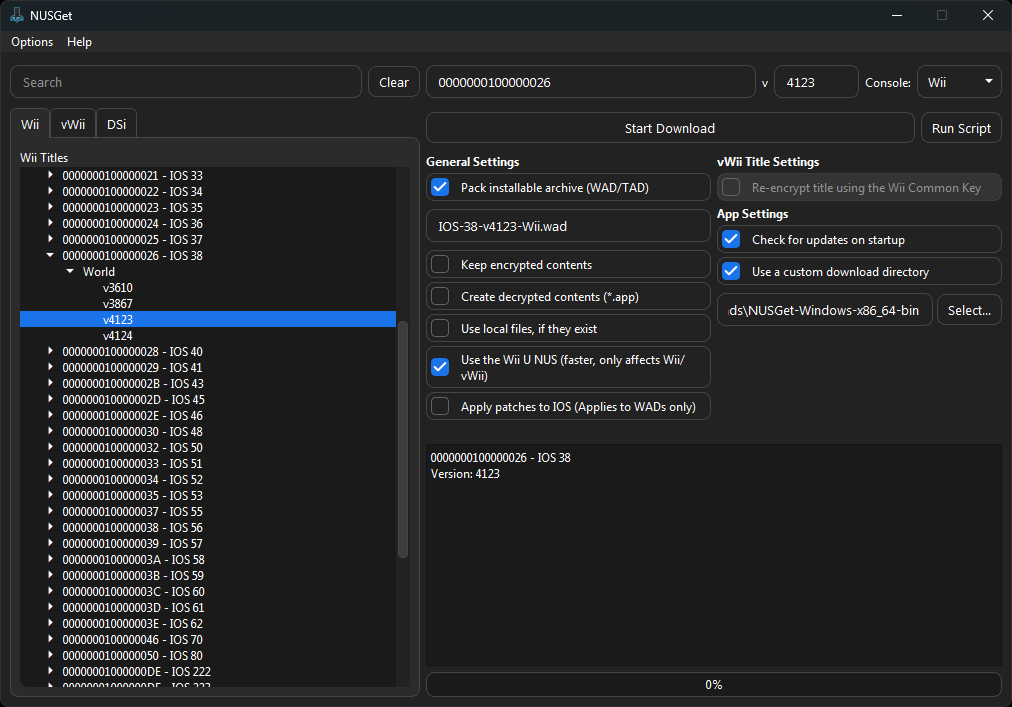
Repeat the above step for
IOS 56 (v5661),IOS 57 (v5918)andIOS 58 (v6175).When you have finished downloading the above IOS, click the folder next to
Start Download. This will open your file manager to NUSGet's download folder.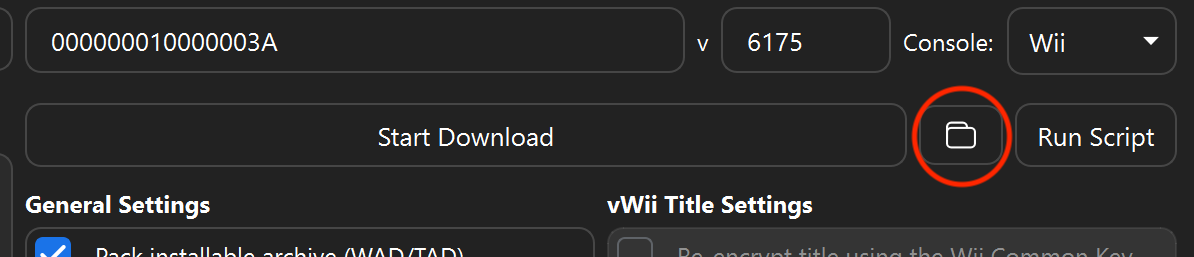
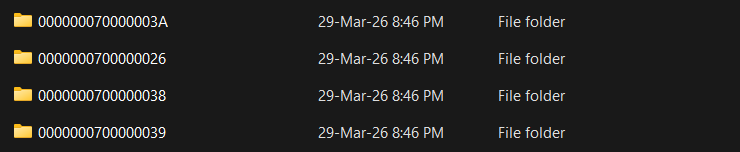
This folder should contain four different folders with the title IDs of the above IOS, as shown here.
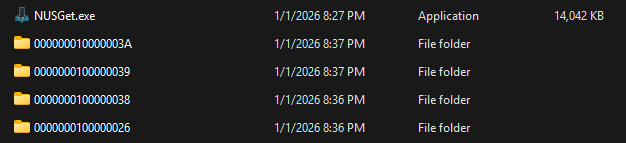
Enter the four directories, locating a
IOS-XX-vXXXX-Wii.wadfile in each.
Wii에 SD 카드 또는 USB 드라이브를 연결하고 홈브류 채널에서 d2x cIOS 설치 프로그램을 실행합니다.
- 이 장치는 d2x cIOS 설치 프로그램이 포함된 동일한 장치여야 합니다.
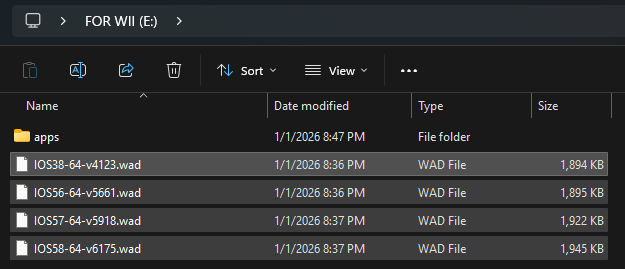
Ensure that each WAD file is named as listed below for compatibility purposes with d2x-cios-installer:
IOS File Name IOS 38 IOS38-64-v4123.wad IOS 56 IOS56-64-v5661.wad IOS 57 IOS57-64-v5918.wad IOS 58 IOS58-64-v6175.wad
INFO
WAD 파일은 다음과 같이 SD 카드에 있어야 합니다:
섹션 II - 설치하기
d2x-cios-installer
.zip파일의apps폴더를 SD 카드나 USB 드라이브의 루트에 복사합니다.Wii에 SD 카드를 연결하고, 홈브류 채널에서 CleanRip을 실행합니다.
콘솔의 전원을 켭니다.
Launch the Homebrew Channel, and launch the Load Priiloader app.
d2x cIOS 설치 프로그램
다음 사항에 맞게 모든 것을 설정합니다:
htmlcIOS <d2x-v11-beta3> 선택 cIOS 베이스 <38> 선택 cIOS 슬롯 <248> 선택 cIOS 리비전 <65535> 선택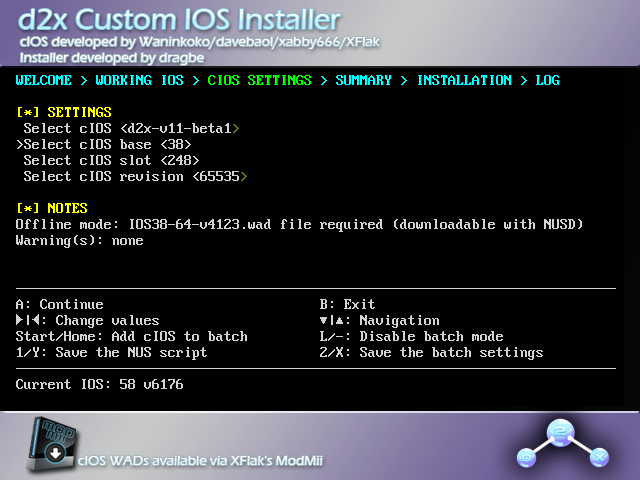
INFO
d2x-v11-beta3이 보이지 않으면 B 버튼을 눌러 설치 프로그램을 종료하고 SD 카드가 잠금 해제되어 있는지 확인하세요.INFO
"
(c)IOS detected in slot ### will be overwritten"라는 경고는 안전하게 무시할 수 있습니다.INFO
"
Slot ### already used in batch settings" 또는 "cIOS already added in batch with revision ##### and slot ###"이라는 메시지가 표시되면-버튼을 눌러 일괄 모드를 비활성화합니다.(설치 프로그램을 종료하려는 경우 버튼은 홈 버튼이 아니라 B 버튼입니다.)
A버튼을 누릅니다. 이렇게 하면 슬롯 맵으로 이동합니다: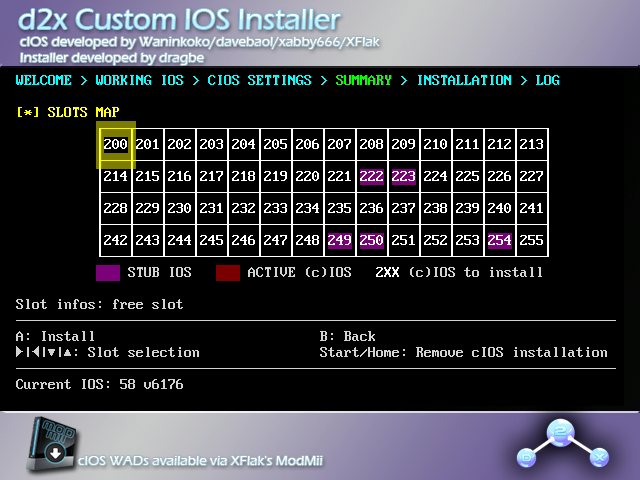
A버튼을 다시 누릅니다.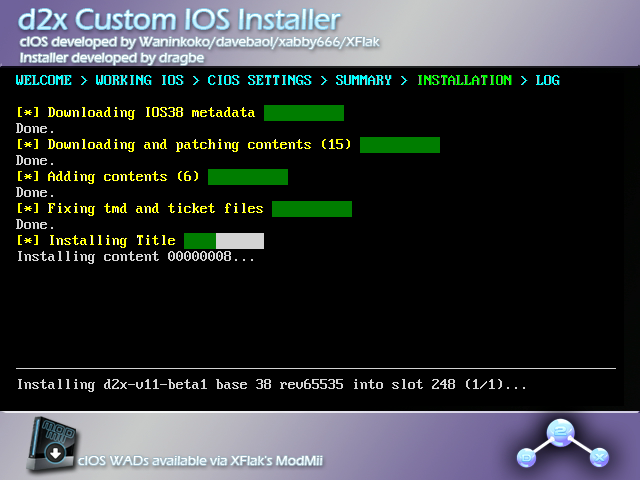
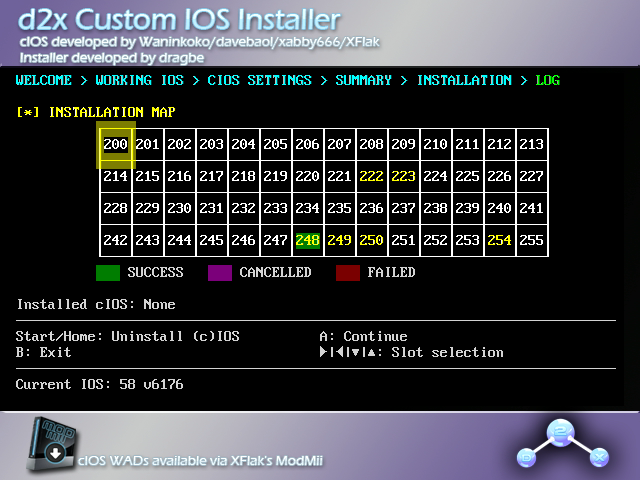
설치가 완료되면 슬롯 맵으로 돌아가게 됩니다. 방금 설치된 슬롯이 녹색으로 강조 표시되었는지 확인합니다.
INFO
슬롯이 빨간색으로 표시되면 cIOS를 다시 설치해 보세요.
다운로드 단계 전/중에 오류가 발생하는 경우 (예:
tcp_connect timeout,net_gethostbyname failed: ...), B 버튼을 눌러 종료하고 섹션 I부터 계속합니다.A버튼을 누릅니다. 구성 화면으로 돌아갑니다.다음 구성으로 이전 5 단계를 반복합니다:
cIOS 249 설치
htmlcIOS <d2x-v11-beta3> 선택 cIOS 베이스 <57> 선택 cIOS 슬롯 <250> 선택 cIOS 리비전 <65535> 선택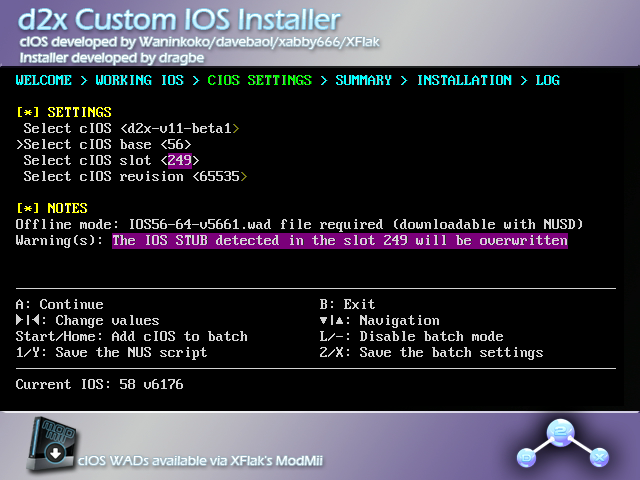
cIOS 250 설치
htmlcIOS <d2x-v11-beta3> 선택 cIOS 베이스 <57> 선택 cIOS 슬롯 <250> 선택 cIOS 리비전 <65535> 선택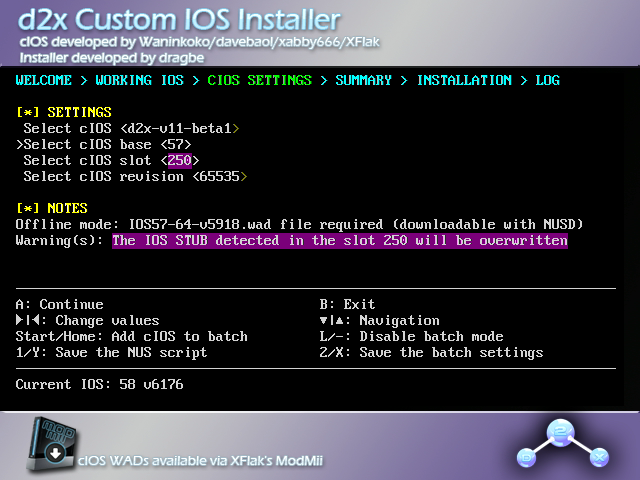
cIOS 251 설치
htmlcIOS <d2x-v11-beta3> 선택 cIOS 베이스 <58> 선택 cIOS 슬롯 <251> 선택 cIOS 리비전 <65535> 선택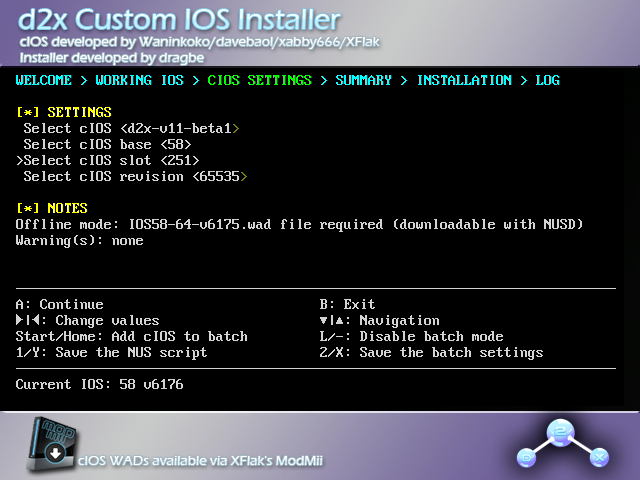
Once you have finished installing all 4 cIOSes, press B to return to the Homebrew Channel.
INFO
섹션 I에서 WAD 파일 4 개를 다운로드한 경우 이제 SD 카드/USB 드라이브에서 해당 파일을 삭제할 수 있습니다.
TIP
Now that the Homebrew Channel, BootMii, Priiloader, and cIOS are all installed, you can install the Open Shop Channel, a trusted repository for homebrew that can be accessed both on and off the Wii.
DANGER
vWii에 Wii/Wii 미니 IOS나 시스템 메뉴를 설치하려고 하지 마세요. 그렇게 하면 콘솔이 벽돌될 가능성이 높습니다.
WARNING
Ensure that if you are using an SD card, the lock switch is in the unlocked position. Otherwise, you will not be able to select the correct options in the installer.
Wii 메뉴는 기존 시스템 채널을 제외하고, 48개 채널로 제한됩니다.
- vWii에 홈브류 채널이 설치된 Wii U
- SD 카드 및 USB 드라이브
- vWii용 d2x cIOS 설치 프로그램
지침
섹션 I - 다운로드
WARNING
Your browser or antivirus software may flag NUSGet as malware - this is a false positive. NUSGet does NOT contain any malware.
TIP
If you are able to connect your vWii to the internet, you may skip to Section II.
Power off your console, and insert your SD card or USB drive into your computer.
On your computer, download NUSGet, choosing the archive corresponding to your operating system. For Windows users, you should choose the
NUSGet-Windows-x86_64-bin.zipfile.Unzip the archive and run the NUSGet executable.
Select the
vWiiplatform, navigate toIOS->IOS 38->Worldand double click onv4380. UncheckKeep encrypted contents. CheckRe-encrypt title using the Wii Common Key, then clickStart Download.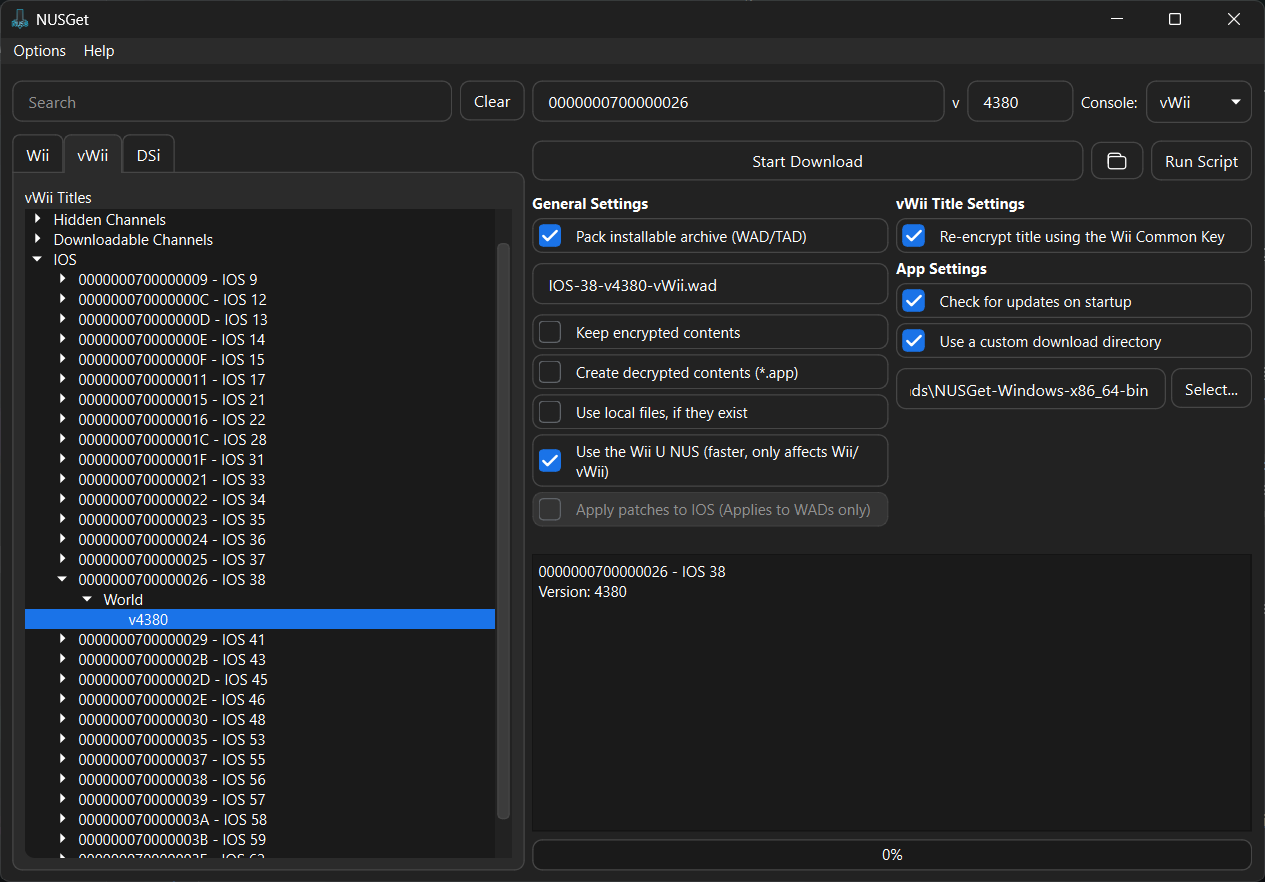
Repeat the above step for
IOS 56 (v5918),IOS 57 (v6175)andIOS 58 (v6432).When you have finished downloading the above IOS, click the folder next to
Start Download. This will open your file manager to NUSGet's download folder.This folder should contain four different folders with the title IDs of the above IOS, as shown here.
Enter the four directories, locating a
IOS-XX-vXXXX-vWii.wadfile in each.
Wii에 SD 카드 또는 USB 드라이브를 연결하고 홈브류 채널에서 d2x cIOS 설치 프로그램을 실행합니다.
- 이 장치는 d2x cIOS 설치 프로그램이 포함된 동일한 장치여야 합니다.
Ensure that each WAD file is named as listed below for compatibility purposes with d2x-cios-installer-vwii:
IOS File Name IOS 38 IOS38-64-v4380.wad IOS 56 IOS56-64-v5918.wad IOS 57 IOS57-64-v6175.wad IOS 58 IOS58-64-v6432.wad
INFO
WAD 파일은 다음과 같이 SD 카드에 있어야 합니다:

섹션 II - 설치하기
D2x-cios-installer-vwii
.zip파일의apps폴더를 SD 카드 또는 USB 드라이브의 루트 폴더에 복사하세요.Wii에 SD 카드를 연결하고, 홈브류 채널에서 CleanRip을 실행합니다.
콘솔의 전원을 켭니다.
Launch the Homebrew Channel, and launch the Load Priiloader app.
d2x cIOS 설치 프로그램
다음 사항에 맞게 모든 것을 설정합니다:
htmlcIOS <d2x-v11-beta3-vWii> 선택 cIOS 베이스 <38> 선택 cIOS 슬롯 <248> 선택
INFO
d2x-v11-beta3-vWii가 보이지 않으면 B 버튼을 눌러 설치 프로그램을 종료하고 SD 카드가 잠금 해제되어 있는지 확인하세요.'A' 버튼을 눌러 설치하세요.
다음 설정을 사용하여 이전 2단계를 반복하세요:
cIOS 249 설치
htmlcIOS <d2x-v11-beta3-vWii> 선택 cIOS 베이스 <56> 선택 cIOS 슬롯 <249> 선택

cIOS 250 설치
htmlcIOS <d2x-v11-beta3-vWii> 선택 cIOS 베이스 <57> 선택 cIOS 슬롯 <250> 선택
cIOS 251 설치
htmlcIOS <d2x-v11-beta3-vWii> 선택 cIOS 베이스 <58> 선택 cIOS 슬롯 <251> 선택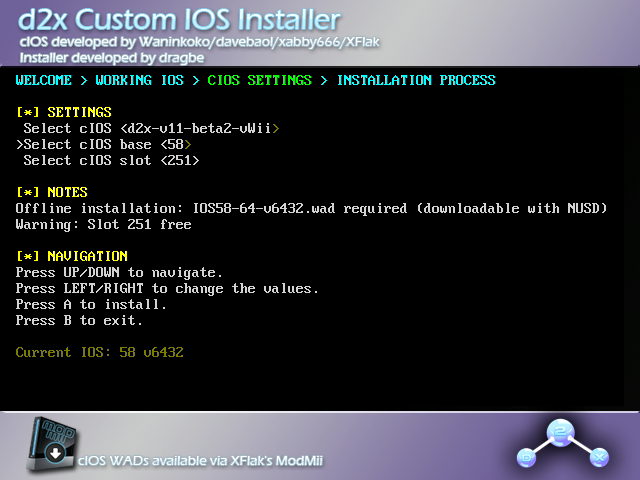
Once you have finished installing all 4 cIOSes, press B to return to the Homebrew Channel.
TIP
Continue to Finalizing Setup (Wii U)
Now that the Homebrew Channel, Priiloader, and cIOS are installed, you can proceed to restore functionality that is normally missing from a standard vWii menu.
DANGER
Wii 미니에 Wii/vWii IOS나 시스템 메뉴를 설치하려고 하지 마세요. 그렇게 하면 콘솔이 벽돌될 가능성이 높습니다.
WARNING
Ensure that if you are using an SD card, the lock switch is in the unlocked position. Otherwise, you will not be able to select the correct options in the installer.
INFO
If you need assistance with this tutorial, please join the Wii mini Hacking Discord server.
Wii 메뉴는 기존 시스템 채널을 제외하고, 48개 채널로 제한됩니다.
- 홈브류 채널이 설치된 Wii 미니
- USB 드라이브
- d2xl cIOS 설치 프로그램
지침
섹션 I - 다운로드
- 콘솔의 전원을 끕니다.
- USB 드라이브를 컴퓨터에 연결하세요.
- d2xl-cios-installer-mini
.zip파일에서apps폴더를 USB 드라이브의 루트 폴더에 복사하세요. - USB 드라이브를 콘솔에 다시 연결합니다.
- 콘솔의 전원을 켭니다.
- Launch the Homebrew Channel, and launch the Load Priiloader app.
- 홈브류 목록에서 d2xl cIOS Installer를 실행합니다.
섹션 II - 설치하기
계속을 선택합니다.계속을 누르고, 다음 옵션을 다음과 같이 설정합니다:
htmlcIOS 선택 <d2xl-v1-beta2> cIOS 기반 선택 <57> cIOS 슬롯 선택 <249>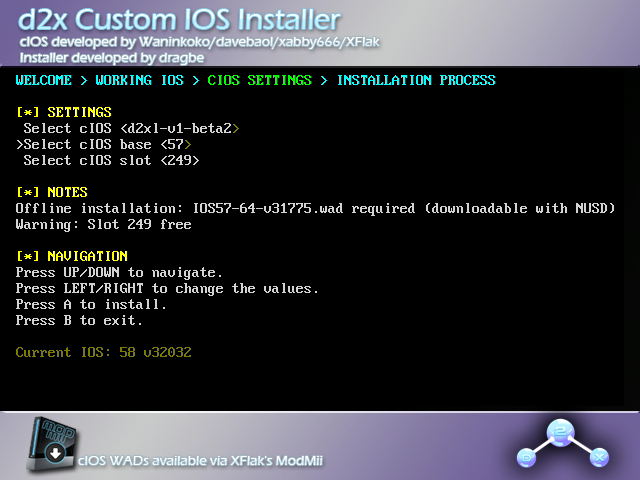

- 메모란을 보시면 iOS 버전 번호가
v31775또는v31776으로 끝나는 것을 확인할 수 있습니다.IOS57-64-v31775는 NTSC (북미) 콘솔용이고,IOS57-64-v31776은 PAL (유럽) 콘솔용입니다. 사용하시는 콘솔에 맞는 버전 번호를 선택했는지 확인하세요.
- 메모란을 보시면 iOS 버전 번호가
설정이 완료되면 A 버튼을 눌러 설치합니다.
- 설치가
TMD 버전 불일치오류로 실패할 경우,cIOS 기반 선택옵션 위에서 +제어판의 왼쪽 또는 오른쪽을 눌러 버전 번호가 이전에 시도한 것과 다를 때까지 기다립니다. 숫자 57은 변경되지 않습니다.
- 설치가
성공적으로 완료되면 설치 프로그램을 종료합니다.
TIP
Continue to Finalizing Setup (Wii mini)
Now that the Homebrew Channel, Priiloader, and cIOS are installed, you can proceed to restore functionality that is normally missing from a standard Wii mini menu.