cIOS
cIOS, or custom IOS, are patched and modified versions of certain IOS (or simply, parts of the Wii's system software) that allow homebrew apps like USB loaders to be able to function where they otherwise would not. While not required for a functioning homebrew setup, it is highly recommended to install cIOS anyway because it augments the functionality of your Wii with little to no downside.
DANGER
Do not attempt to install a vWii/Wii mini IOS or System Menu on the Wii. Doing so will likely brick your console.
WARNING
Ensure that if you are using an SD card, the lock switch is in the unlocked position. Otherwise, you will not be able to select the correct options in the installer.
Requirements
- A Wii with the Homebrew Channel installed
- An SD card or USB drive
- The d2x cIOS Installer
Instructions
Section I - Downloading
WARNING
Your browser or antivirus software may flag NUSGet as malware - this is a false positive. NUSGet does NOT contain any malware.
TIP
If you are able to connect your Wii to the internet, you may skip to Section II.
Power off your console, and insert your SD card or USB drive into your computer.
On your computer, download NUSGet, choosing the archive corresponding to your operating system. For Windows users, you should choose the
NUSGet-Windows-x86_64-bin.zipfile.Unzip the archive and run the NUSGet executable.
Navigate to
IOS->IOS 38->Worldand double click onv4123. UncheckKeep encrypted contents, then clickStart Download.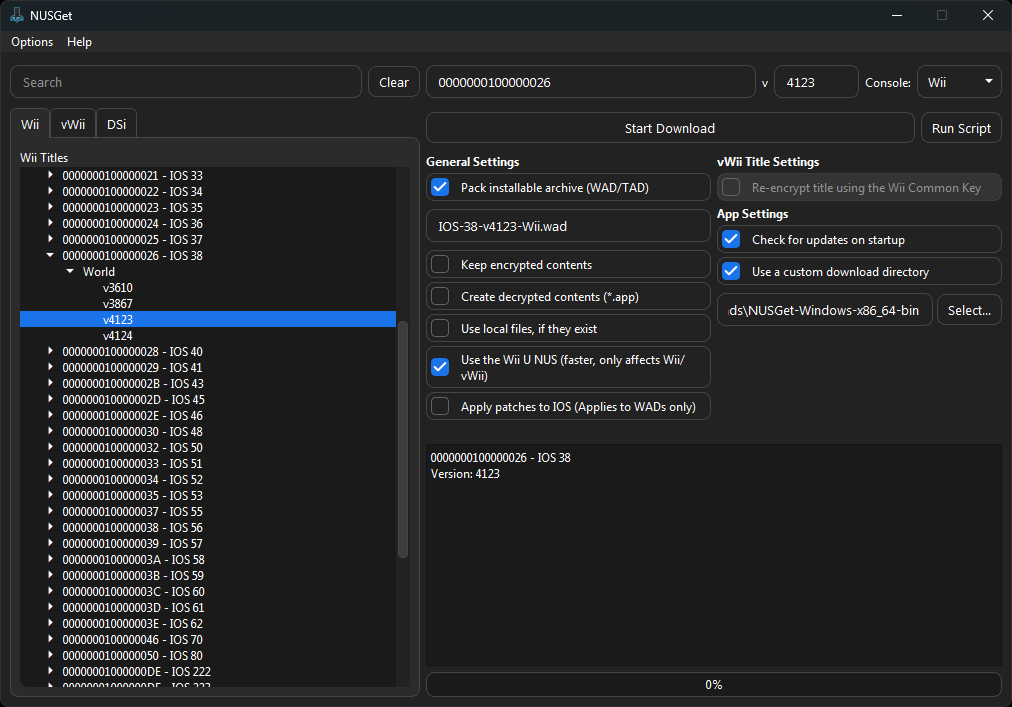
Repeat the above step for
IOS 56 (v5661),IOS 57 (v5918)andIOS 58 (v6175).When you have finished downloading the above IOS, click the folder next to
Start Download. This will open your file manager to NUSGet's download folder.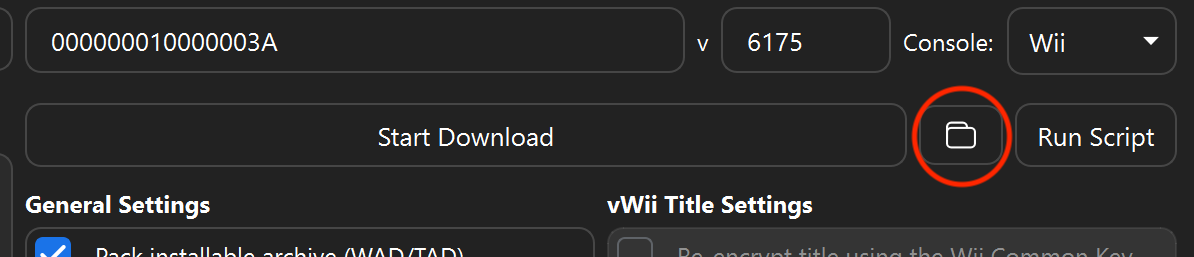
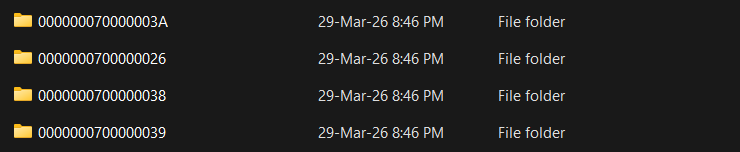
This folder should contain four different folders with the title IDs of the above IOS, as shown here.
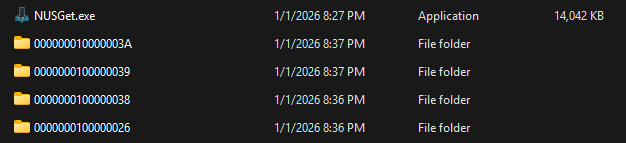
Enter the four directories, locating a
IOS-XX-vXXXX-Wii.wadfile in each.
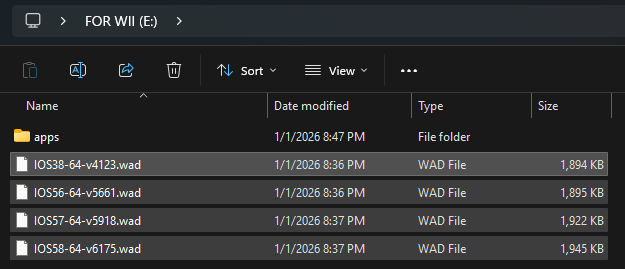
Place each WAD file on the root of your SD card or USB drive.
- This must be the same device containing the d2x cIOS Installer.
Ensure that each WAD file is named as listed below for compatibility purposes with d2x-cios-installer:
IOS File Name IOS 38 IOS38-64-v4123.wad IOS 56 IOS56-64-v5661.wad IOS 57 IOS57-64-v5918.wad IOS 58 IOS58-64-v6175.wad
INFO
The WAD files should be on your SD card like this:
Section II - Installing
Copy the
appsfolder in the d2x-cios-installer.zipto the root of your SD card or USB drive.Reinsert your SD card or USB drive into your console.
Power on your console.
Launch the Homebrew Channel.
Launch d2x cIOS Installer from the list of homebrew.
Set everything to match the following:
htmlSelect cIOS <d2x-v11-beta3> Select cIOS base <38> Select cIOS slot <248> Select cIOS revision <65535>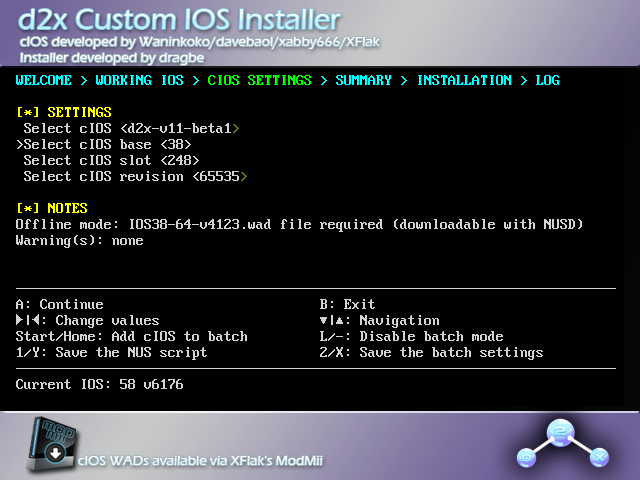
INFO
If you do not see
d2x-v11-beta3, exit the installer with B, and make sure your SD card is unlocked.INFO
The warning "
(c)IOS detected in slot ### will be overwritten" can be safely ignored.INFO
If you are seeing "
Slot ### already used in batch settings" or "cIOS already added in batch with revision ##### and slot ###", press-to disable batch mode.(If you are trying to exit the installer, the button is B, not Home.)
Press
A. This will bring you to the slot map: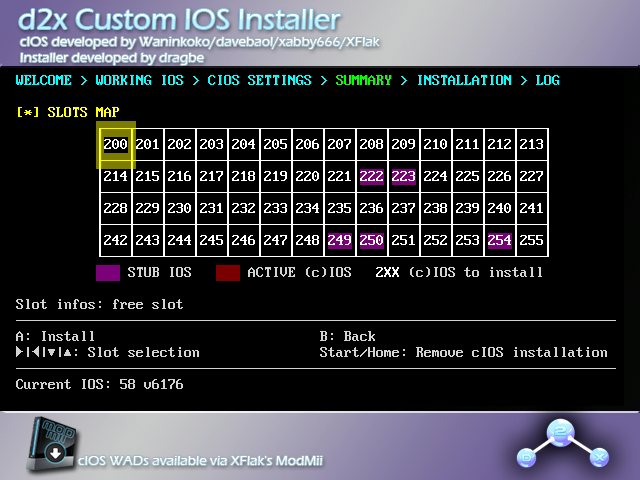
Press
Aagain.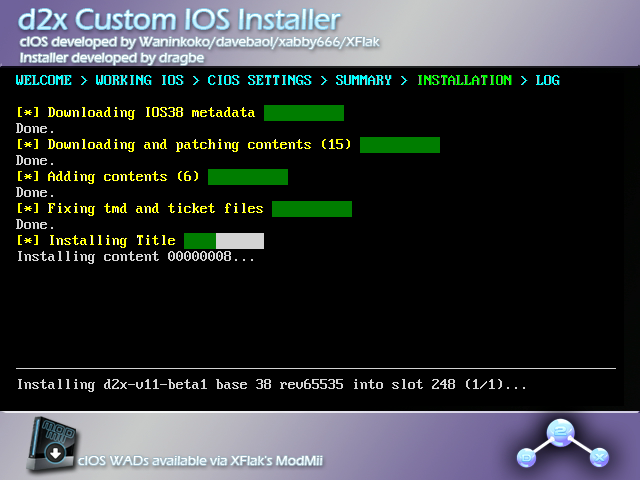
After the installation has finished, you will be brought back to the slot map. Ensure that the slot that was just installed is highlighted green.
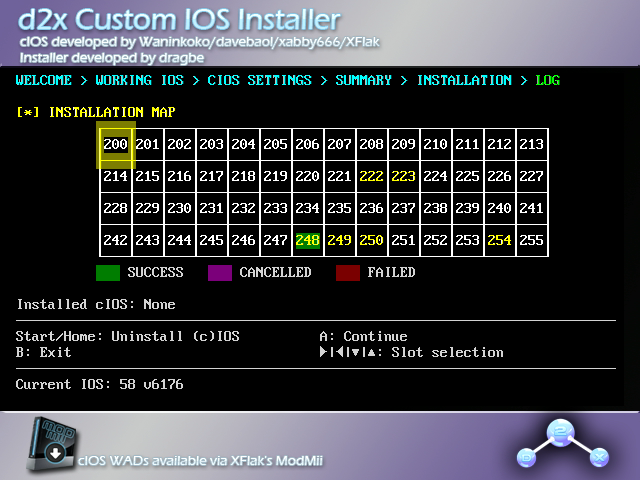
INFO
If the slot is highlighted red, try to install the cIOS again.
If you are getting an error before/during the downloading stages (eg.
tcp_connect timeout,net_gethostbyname failed: ...), press B to exit and continue from Section I.Press
A. This will return you to the configuration screen.Repeat the previous 5 steps with the following configurations:
cIOS 249 Installation
htmlSelect cIOS <d2x-v11-beta3> Select cIOS base <56> Select cIOS slot <249> Select cIOS revision <65535>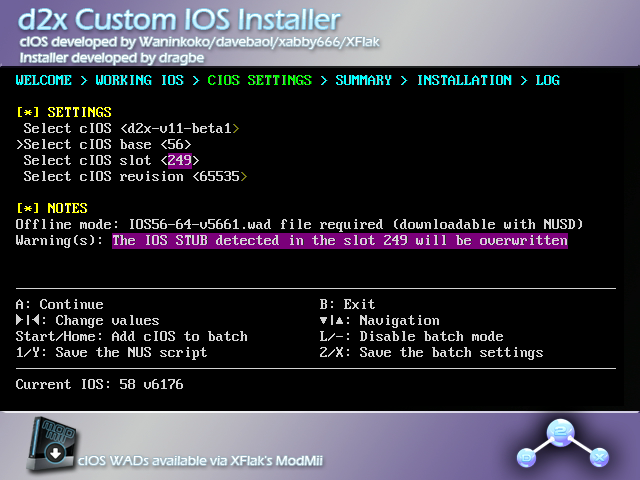
cIOS 250 Installation
htmlSelect cIOS <d2x-v11-beta3> Select cIOS base <57> Select cIOS slot <250> Select cIOS revision <65535>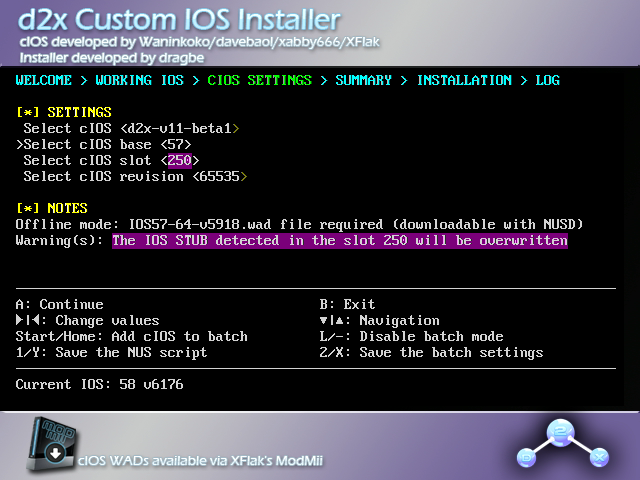
cIOS 251 Installation
htmlSelect cIOS <d2x-v11-beta3> Select cIOS base <58> Select cIOS slot <251> Select cIOS revision <65535>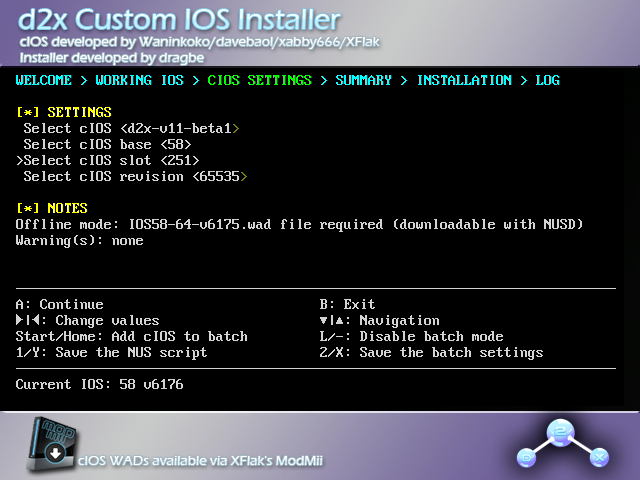
Once you have finished installing all 4 cIOSes, press B to return to the Homebrew Channel.
INFO
If you downloaded the 4 WAD files in Section I, you may now delete them from your SD card/USB drive.
TIP
Continue to Open Shop Channel installation
Now that the Homebrew Channel, BootMii, Priiloader, and cIOS are all installed, you can install the Open Shop Channel, a trusted repository for homebrew that can be accessed both on and off the Wii.
DANGER
Do not attempt to install a Wii/Wii mini IOS or System Menu on the vWii. Doing so will likely brick your console.
WARNING
Ensure that if you are using an SD card, the lock switch is in the unlocked position. Otherwise, you will not be able to select the correct options in the installer.
Requirements
- A Wii U with the Homebrew Channel installed on the vWii
- An SD card or USB drive
- The d2x cIOS Installer for vWii
Instructions
Section I - Downloading
WARNING
Your browser or antivirus software may flag NUSGet as malware - this is a false positive. NUSGet does NOT contain any malware.
TIP
If you are able to connect your vWii to the internet, you may skip to Section II.
Power off your console, and insert your SD card or USB drive into your computer.
On your computer, download NUSGet, choosing the archive corresponding to your operating system. For Windows users, you should choose the
NUSGet-Windows-x86_64-bin.zipfile.Unzip the archive and run the NUSGet executable.
Select the
vWiiplatform, navigate toIOS->IOS 38->Worldand double click onv4380. UncheckKeep encrypted contents. CheckRe-encrypt title using the Wii Common Key, then clickStart Download.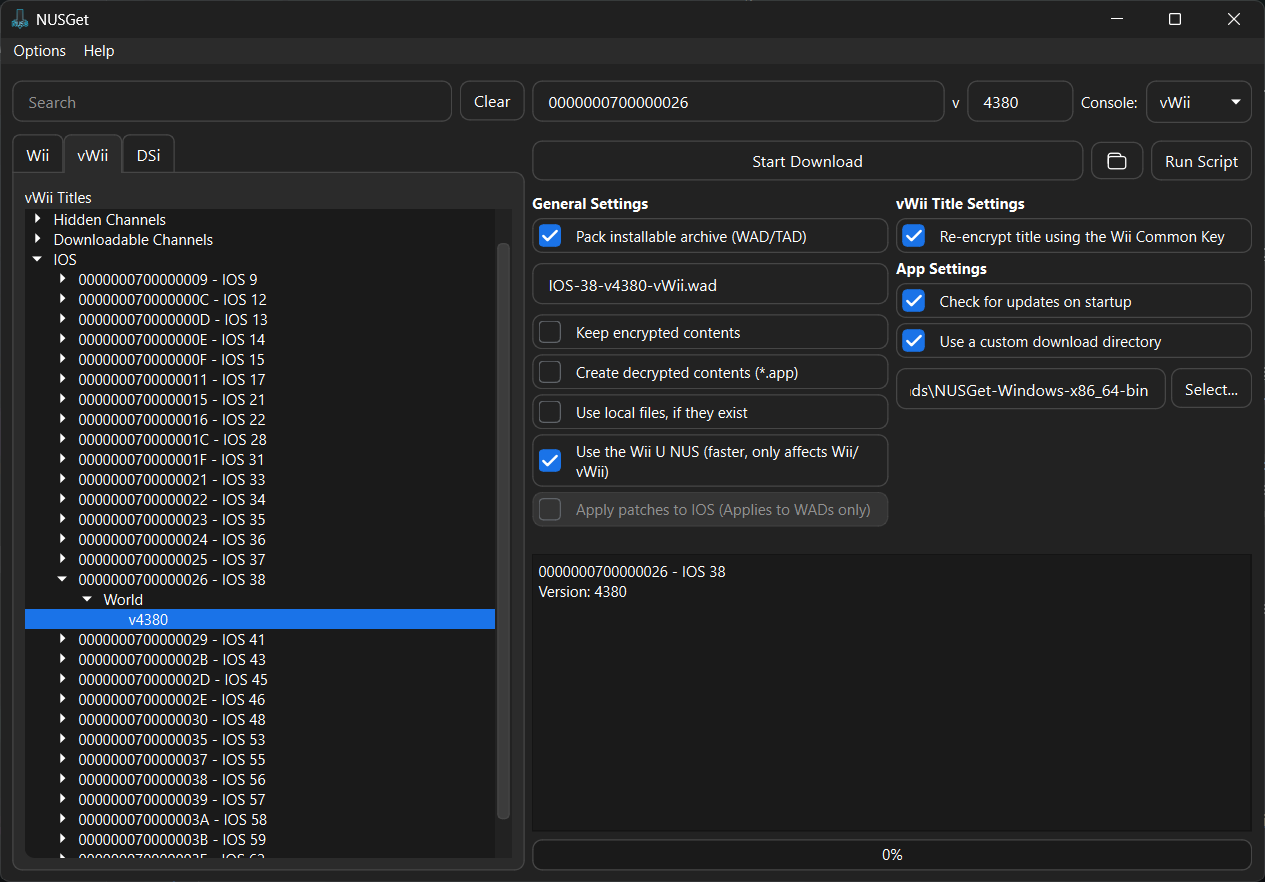
Repeat the above step for
IOS 56 (v5918),IOS 57 (v6175)andIOS 58 (v6432).When you have finished downloading the above IOS, click the folder next to
Start Download. This will open your file manager to NUSGet's download folder.This folder should contain four different folders with the title IDs of the above IOS, as shown here.
Enter the four directories, locating a
IOS-XX-vXXXX-vWii.wadfile in each.
Place each WAD file on the root of your SD card or USB drive.
- This must be the same device containing the d2x cIOS Installer.
Ensure that each WAD file is named as listed below for compatibility purposes with d2x-cios-installer-vwii:
IOS File Name IOS 38 IOS38-64-v4380.wad IOS 56 IOS56-64-v5918.wad IOS 57 IOS57-64-v6175.wad IOS 58 IOS58-64-v6432.wad
INFO
The WAD files should be on your SD card like this:

Section II - Installing
Copy the
appsfolder in the d2x-cios-installer-vwii.zipto the root of your SD card or USB drive.Reinsert your SD card or USB drive into your console.
Power on your console.
Launch the Homebrew Channel.
Launch d2x cIOS Installer from the list of homebrew.
Set everything to match the following:
htmlSelect cIOS <d2x-v11-beta3-vWii> Select cIOS base <38> Select cIOS slot <248>
INFO
If you do not see
d2x-v11-beta3-vWii, exit the installer with B, and make sure your SD card is unlocked.Press
Ato install.Repeat the previous 2 steps with the following configurations:
cIOS 249 Installation
htmlSelect cIOS <d2x-v11-beta3-vWii> Select cIOS base <56> Select cIOS slot <249>

cIOS 250 Installation
htmlSelect cIOS <d2x-v11-beta3-vWii> Select cIOS base <57> Select cIOS slot <250>
cIOS 251 Installation
htmlSelect cIOS <d2x-v11-beta3-vWii> Select cIOS base <58> Select cIOS slot <251>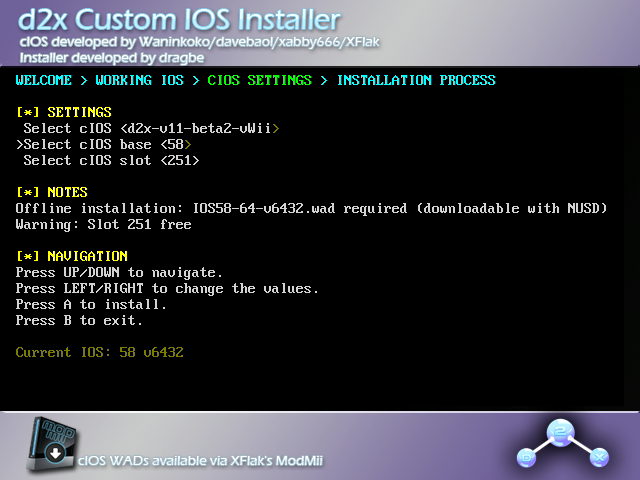
Once you have finished installing all 4 cIOSes, press B to return to the Homebrew Channel.
TIP
Continue to Finalizing Setup (Wii U)
Now that the Homebrew Channel, Priiloader, and cIOS are installed, you can proceed to restore functionality that is normally missing from a standard vWii menu.
DANGER
Do not attempt to install a Wii/vWii IOS or System Menu on the Wii mini. Doing so will likely brick your console.
WARNING
Ensure that if you are using an SD card, the lock switch is in the unlocked position. Otherwise, you will not be able to select the correct options in the installer.
INFO
If you need assistance with this tutorial, please join the Wii mini Hacking Discord server.
Requirements
- A Wii mini with the Homebrew Channel installed
- A USB drive
- The d2xl cIOS Installer
Instructions
Section I - Downloading
- Power off your console.
- Insert your USB drive into your computer.
- Copy the
appsfolder from the d2xl-cios-installer-mini.zipto the root of your USB drive. - Reinsert your USB drive into your console.
- Power on your console.
- Launch the Homebrew Channel.
- Launch d2xl cIOS Installer from the list of homebrew.
Section II - Installing
Select
Continue.Set the options to the following:
htmlSelect cIOS <d2xl-v1-beta2> Select cIOS base <57> Select cIOS slot <249>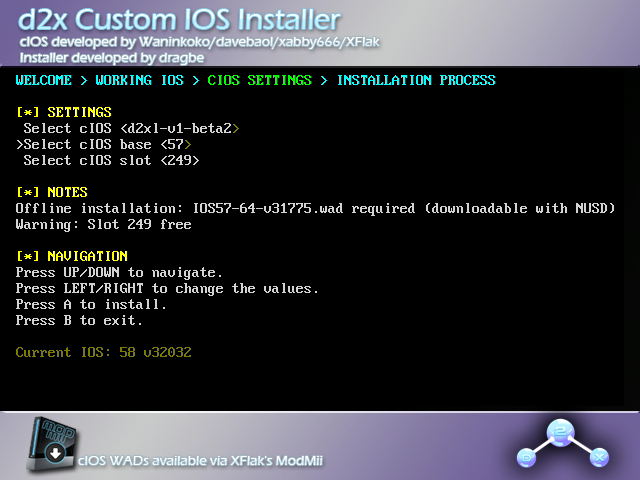

- Under notes, you will see an IOS version number ending in either
v31775orv31776.IOS57-64-v31775is for NTSC (North American) consoles, whileIOS57-64-v31776is for PAL (European) consoles. Make sure you are selecting the correct version number for your console.
- Under notes, you will see an IOS version number ending in either
Press A to install.
- If the install fails with a
TMD version mismatcherror, press left or right on the +Control Pad over theSelect cIOS baseoption until the version number is different than the one you tried before. The number 57 will not change.
- If the install fails with a
When the process is complete, exit the installer.
TIP
Continue to Finalizing Setup (Wii mini)
Now that the Homebrew Channel, Priiloader, and cIOS are installed, you can proceed to restore functionality that is normally missing from a standard Wii mini menu.